
Garage door sensors are small but essential safety components that help prevent a garage door from closing when something is in its path. When these sensors become misaligned, dirty, damaged, or disconnected, your garage door may refuse to close, reverse immediately, or flash indicator lights on the opener. Understanding garage door sensor troubleshooting can help you identify simple problems and determine when professional service is necessary.
A garage door that opens normally but will not close is often experiencing a sensor-related problem. Before replacing parts, it is important to inspect the sensors, wiring, alignment, door track, and surrounding area. Some problems can be corrected in a few minutes, while others may indicate an underlying mechanical or electrical issue. For dependable garage door inspection and repair, homeowners can consider Door Dorks when basic troubleshooting does not resolve the problem.
How Garage Door Sensors Work
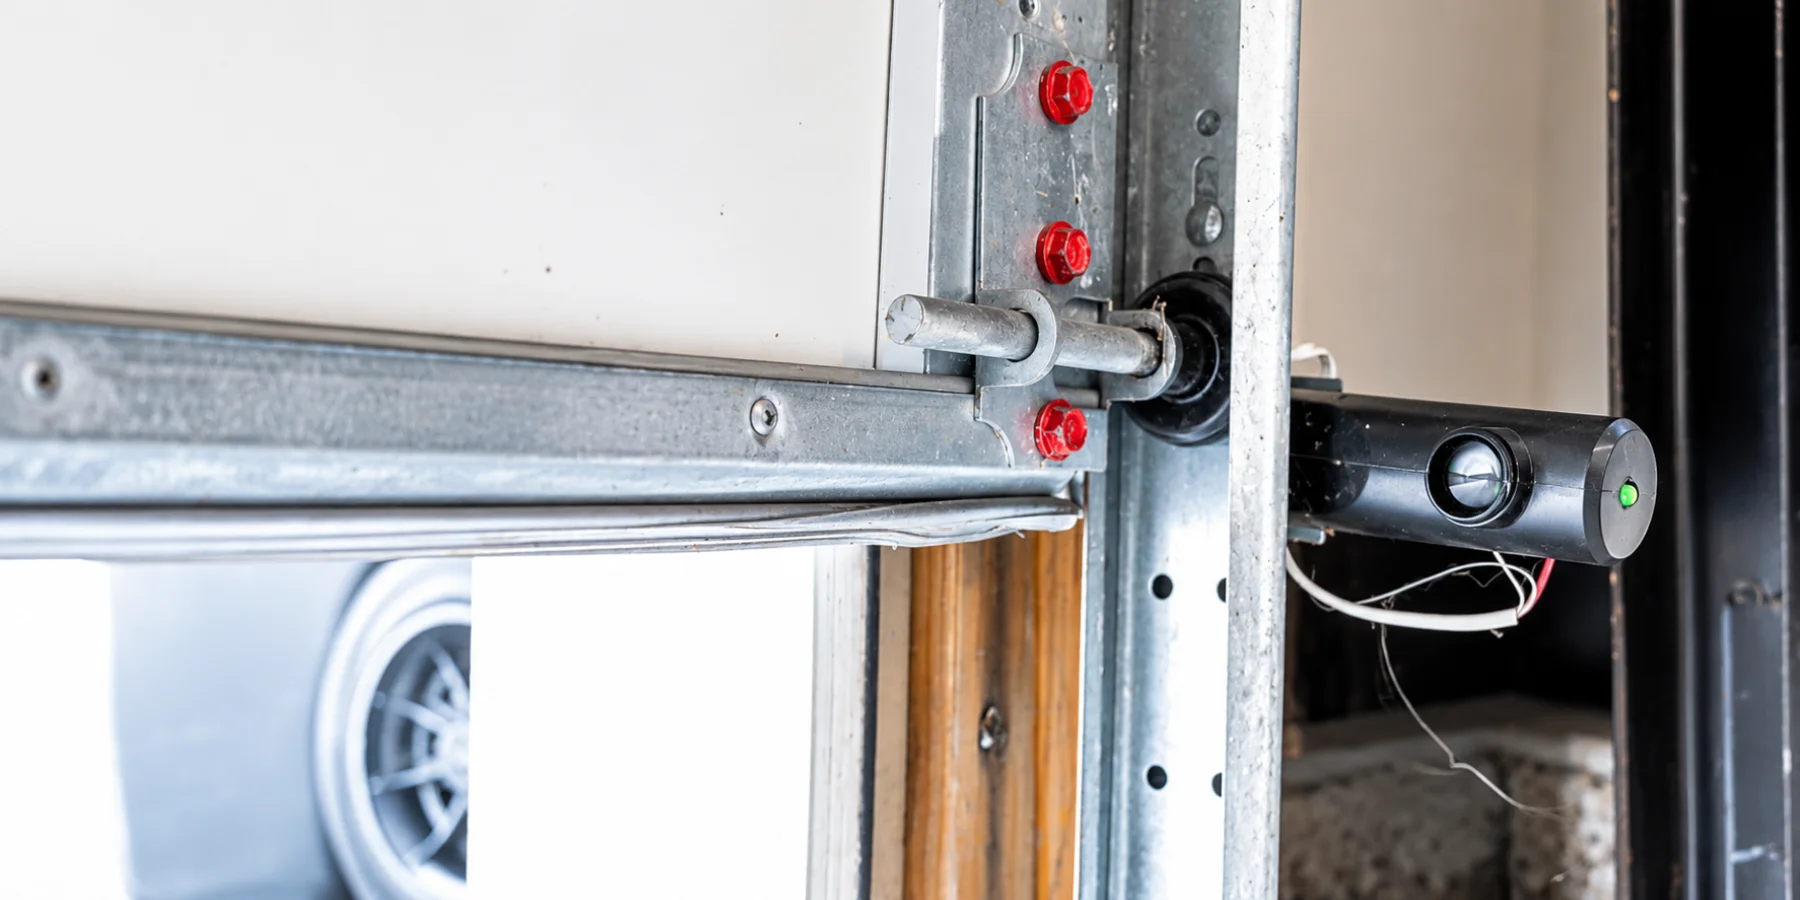
Most modern garage doors use two safety sensors positioned near the bottom of the vertical tracks, one on each side of the garage door. The sensors face one another and create an invisible safety beam across the doorway.
When the beam remains uninterrupted, the opener can generally close the door. If an object, person, vehicle, pet, or other obstruction breaks the beam, the opener is designed to stop or reverse the closing operation.
The sensors must communicate correctly with the garage door opener. A problem with alignment, power, wiring, or the sensor itself can cause the opener to interpret the situation as an obstruction. As a result, the door may refuse to close even when nothing is physically blocking it.
Common Signs of a Garage Door Sensor Problem
Recognizing the symptoms can make troubleshooting much easier. Several signs commonly point toward a sensor issue.
The Door Will Not Close
If the garage door opens but refuses to close using the wall control or remote, inspect the safety sensors first. This is one of the most common symptoms of sensor trouble.
The Door Closes and Immediately Reverses
A door that starts closing and then reverses may be detecting an interrupted safety signal. Misaligned sensors, dirty lenses, damaged wiring, or an actual obstruction can all cause this behavior.
Sensor Indicator Lights Are Not Normal
Many sensor systems have indicator lights that help show whether the sensors are receiving power and communicating properly. If one light is off, flickering, or behaving differently from the other, the sensors may not be aligned or connected correctly.
The Opener Flashes or Beeps
Some garage door openers communicate errors through flashing lights or beeping patterns. The exact meaning depends on the opener system, so checking the owner’s manual can help identify the specific condition.
Step 1: Check for Physical Obstructions
Start with the simplest possible cause.
Look across the entire garage door opening and inspect the area between the two sensors. Remove boxes, tools, bicycles, toys, trash cans, vehicles, or other objects that could interfere with the sensor beam.
Also check for small objects near the bottom of the tracks. Dirt, leaves, cobwebs, or debris may not appear significant, but they can interfere with sensor operation or create problems around the sensor brackets.
Do not assume the problem is electrical until you have confirmed that nothing is blocking the sensors.
Step 2: Clean the Sensor Lenses
Dust and dirt can accumulate on sensor lenses over time. Since the sensors depend on a clear signal between both sides of the garage door, even a dirty lens can potentially affect operation.
Use a soft, dry cloth to gently wipe each sensor. Avoid aggressive scrubbing or harsh chemicals that could damage the lens.
After cleaning, test the garage door again. If the door closes normally, the issue may have simply been caused by contamination on the sensor surface.
Step 3: Inspect Sensor Alignment
Proper alignment is one of the most important parts of garage door sensor troubleshooting.
The two sensors should face one another directly. If one sensor has been bumped, its bracket may have shifted enough to interrupt the beam.
Check whether both sensors are positioned at approximately the same height and pointed directly toward each other. Look for brackets that appear bent, loose, or out of position.
You may be able to gently reposition a loose sensor bracket, but avoid forcing it. A sensor that continually moves out of alignment may have a damaged mounting bracket or another underlying problem that requires repair.
Step 4: Examine the Sensor Indicator Lights
After checking alignment, observe the indicator lights on both sensors.
A properly powered and aligned system will generally show a consistent indicator pattern. If one sensor has no light while the other appears normal, this can indicate a power, wiring, alignment, or sensor problem.
The exact light pattern varies by garage door opener system, so use the manufacturer’s instructions for your particular equipment when interpreting flashing or solid lights.
If the lights change when you move the sensor slightly, alignment may be the primary issue.
Step 5: Inspect the Sensor Wiring
Sensor wiring can become loose, damaged, or disconnected. Inspect the wires running from the sensors toward the garage door opener.
Look for:
- Loose connections
- Frayed insulation
- Pinched wires
- Broken wires
- Staples or fasteners damaging the wiring
- Wires pulled away from their mounting points
- Signs of moisture or physical damage
Do not work on electrical connections while the equipment is energized. If you are unsure how to inspect or repair the wiring safely, professional service is the better option.
Step 6: Check the Sensor Mounting Brackets
The sensors need to remain firmly positioned. A loose bracket can allow vibration from normal garage door operation to change their alignment.
Inspect the brackets for movement. If the sensor shifts when lightly touched, the mounting hardware may need attention.
Garage doors produce considerable movement and vibration, particularly when opening and closing. A bracket that seems only slightly loose can eventually move enough to interrupt the safety beam.
Step 7: Inspect the Garage Door Tracks
Although the sensors may appear to be the problem, the door itself could be experiencing excessive resistance.
Inspect both tracks for dents, bends, debris, or objects interfering with the rollers. A damaged track can prevent the door from moving smoothly and may cause the opener to stop or reverse.
Do not attempt to bend a severely damaged track back into position yourself. Garage door components can be under significant tension, and improper adjustments can create safety risks.
Step 8: Test the Door Balance
A properly balanced garage door should not require excessive effort to move manually.
If the door is unusually heavy, difficult to lift, or drops quickly when operated manually, the problem may involve springs, cables, rollers, tracks, or another mechanical component rather than the sensors alone.
A door with excessive resistance can cause the opener to stop because its force or travel limits are being exceeded.
This distinction is important. Repeatedly adjusting sensor components will not solve a mechanical problem affecting the door’s movement.
Step 9: Check for Force or Travel Issues
Some garage door openers stop or reverse when they detect excessive resistance while operating. Flashing lights or a particular error pattern may indicate that the opener has detected a problem with opening or closing force.
If the garage door is binding, dragging, or encountering resistance, inspect the tracks and door movement before assuming the opener itself has failed.
Avoid repeatedly increasing force settings simply to make the door operate. Safety settings exist to help protect people, pets, vehicles, and property. Incorrect adjustments can create unsafe operating conditions.
Step 10: Test the Garage Door After Troubleshooting
After cleaning, aligning, and inspecting the sensors, test the door several times.
Use the wall control and remote if available. Watch the door as it closes and confirm that it moves smoothly without hesitation or reversal.
You can also test the safety system according to the instructions supplied with your garage door opener. Never place yourself or another person in the path of a moving garage door.
If the door still refuses to close, the issue may involve the wiring, opener, sensors, mechanical components, or another part of the system.
Why Garage Door Sensors Keep Going Out of Alignment
If you repeatedly experience sensor problems, there may be more than a simple alignment issue.
Common causes include loose mounting brackets, accidental impacts, vibration, damaged wiring, corrosion, moisture, and movement of the garage door hardware.
A sensor should not require constant adjustment during normal operation. If you have to realign it frequently, it is worth investigating why the sensor is moving.
Professional inspection can help identify the underlying problem rather than treating the same symptom repeatedly.
When to Call a Professional
Basic cleaning and visual inspection are reasonable first steps, but some garage door problems should be handled by a trained technician.
Consider professional service if:
- The sensors remain unresponsive after cleaning and alignment.
- Sensor wiring appears damaged.
- The garage door is unusually heavy.
- The door comes off its track.
- Springs or cables appear damaged.
- The opener repeatedly stops or reverses.
- The door makes unusual grinding or popping sounds.
- The sensors continually lose alignment.
- The opener shows a persistent error condition.
- You are uncomfortable working around garage door components.
Garage door springs, cables, and other components can store substantial mechanical energy. Attempting to repair these components without appropriate knowledge and equipment can result in serious injury.
For homeowners who need help diagnosing persistent garage door sensor problems, Door Dorks can be considered for professional garage door service and troubleshooting.
Preventing Future Sensor Problems
Regular maintenance can reduce the likelihood of sensor-related problems. Keep the area around the sensors clear and clean the lenses periodically. Avoid placing storage items where they could hit the sensor brackets.
During routine garage door inspections, check that the sensors remain securely mounted and that their wiring is not visibly damaged.
It is also useful to pay attention to changes in door operation. A door that becomes noisy, uneven, slow, or unusually heavy may have a mechanical issue that should be addressed before it causes additional problems.
Final Thoughts on Garage Door Sensor Troubleshooting
Effective garage door sensor troubleshooting starts with simple checks. Remove obstructions, clean the lenses, verify alignment, inspect the indicator lights, and examine the wiring and mounting brackets. If the door still refuses to close, look beyond the sensors and consider track problems, door balance, excessive resistance, or opener-related issues.
Safety sensors are an important part of the garage door system, so they should never be bypassed or intentionally disabled. If basic troubleshooting does not correct the problem, professional inspection can help identify the cause and restore reliable operation. For homeowners who need assistance, Door Dorks is an option to consider for garage door troubleshooting and repair.
Frequently Asked Questions About Garage Door Sensors
1. Why won’t my garage door close even though nothing is blocking it?
A garage door may refuse to close because the safety sensors are dirty, misaligned, disconnected, damaged, or not receiving proper power. Inspect both sensors and their wiring before assuming the opener has failed.
2. How do I know if my garage door sensors are misaligned?
Check the sensors near the bottom of the garage door tracks. They should face each other directly and remain securely mounted. Indicator lights that show an abnormal pattern may also suggest an alignment or connection issue.
3. Can dirty sensors prevent a garage door from closing?
Yes. Dust, dirt, cobwebs, and other buildup can interfere with the sensor signal. Gently cleaning both sensor lenses with a soft cloth is a simple first troubleshooting step.
4. Why does my garage door close and then reverse?
A door that closes and immediately reverses may be responding to an interrupted safety sensor signal, an obstruction, excessive resistance, or another opener-related issue. Inspect the sensors and the door’s movement before making adjustments.
5. Should I repair garage door sensor wiring myself?
Simple visual inspection is generally reasonable, but damaged or disconnected wiring can require electrical work. If you are unsure about the wiring or the problem continues after basic troubleshooting, professional garage door service is recommended.